Check out what we're studying in ART!

Showing posts with label 2nd grade. Show all posts

Thursday, April 19, 2012

Andy Warhol's Cats and Soup Can Ink Blot Prints


Andy Warhol is not only famous for screenprinting in a repetative manner, but also for his illustrations and advertisements early in his career. He discovered a blotted line technique where he would draw with wet ink and before it dried, lay a piece of paper on top of the wet print and pulling a textured line print. He enjoyed how it wasn't perfectly uniform and produced a unique result.


I first drew a reproduction of Andy's cat and soup can that was very simplified. Then made copies. The key to pulling these prints is having watered down ink/paint, working quickly, and using just the tip of the bristles of a plastic bristled brush. Work fast or it might dry on you. We talked about this and what to do if it does. Put a plexi glass plate on the top of the photocopy. Have a piece of construction paper or white drawing paper with your name on the back handy. After tracing over with wet ink, quickly lay the paper on top. Rub the back then pull away from the plate to pull your print. After pulling the print, I told students they could look at Andy's prints for inspiration or simply create a new design!


Friday, March 23, 2012

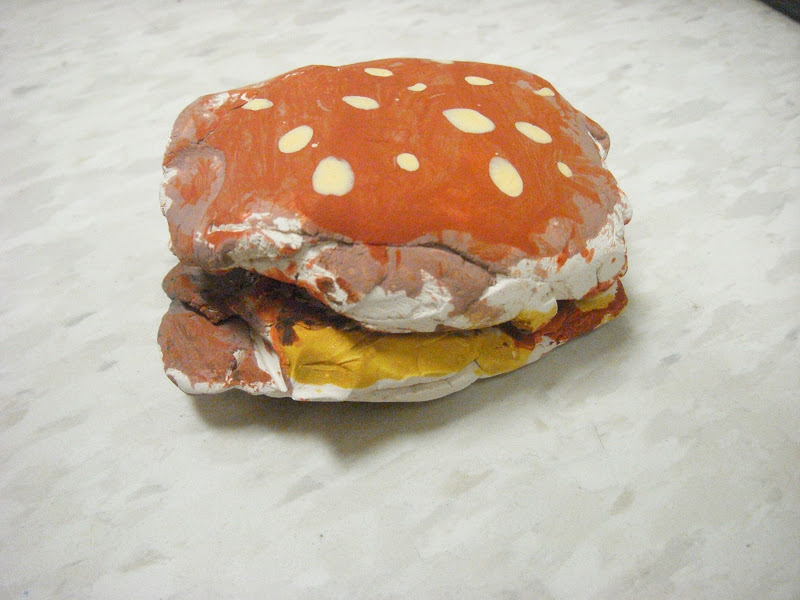
Claes Oldenburg Clay Food Sculpture!

Miss Oetken's blueberry pie, cheeseburger with the works and a club sandwich with olive (modeled the sandwich
after Claes Oldenburg soft sculpture of a sandwich very much like this)

2nd grade reviewed the large scale food sculptures of Claes Oldenburg. We compared and discussed which ones were soft sculptures and which ones were hard sculptures of the different food sculptures. We also reviewed that all were very large scale sculptures. Then we brainstormed what kinds of food we could make. We went through clay techniques and procedure. Next time after they're fired, we're going to paint them and then glue them to a small white paper plate to display our yummy foods! Here are a few examples from last year!

cheeseburger


sausage and pepperoni pizza slice


cupcake with sprinkles


bowl of cherries, bananas and ice cream, fruit bowl:grapesw, strawberries and a banana


Eggs, bacon and sausage


ice cream cone


Here's a hotdog with ketchup and mustard


birthday cake with cherry


taco with all kinds of fixins


Monday, March 19, 2012

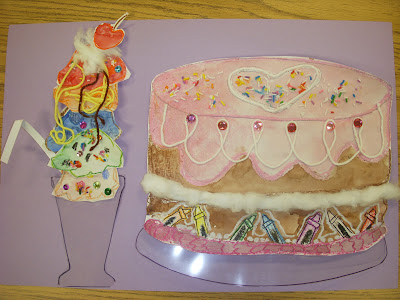
Wayne Thiebaud's Tasty Treats & Creative Confections!


Miss Oetken's Wayne Thiebaud Ice Cream Float and Cake
This is by far one of my very favorite art lessons-but last year got busy and I forgot to post this! How could I?! Well here it is. Wayne Theibaud makes these mouthwatering depictions of cakes, pies, ice cream cones, floats, and many kinds of candy. He likes to give his paintings demension by thickly applying his paint to mimic the frosting on his cakes and sweets. We were inspired by these sweet confections and had a choice at making the float or a cake!


I showed students how to draw with pencil first, a 3-demensional cake using the space of the paper. We talked about detail.


Students then could use metallic crayons, construction paper crayons, and regular crayons to press hard to outline their cakes and decorative frosting.


Next, it's time to turn it into a crayon watercolor resist with metallic watercolors, regular watercolors, and liquid watercolors. HERE's THE COOL PART- in the students' rinsing water container, I added a couple drops of either vanilla extract, orange extract, or lemon extract to make it like a scratch and sniff painting!!! It smelled like a bakery in the art room!!! We loved it.


For the ice cream float, I showed students how to trace the scoops, and they should make 6 different flavors! Add detail with toppings to show us what kind of ice cream it is. Outline with crayon. Then watercolor on top!

Let dry and then the real fun begins! I told students for our 2nd classtime, to cut out carefully. For the ice cream float, assemble scoops on top of each other like a tower. Now it's time to decorate! We had different tasty stations! Whipped cream table was cotton balls that you can gently pull apart and apply with glue for whipped frosting or whipped cream! We also had a candy station that were jewels and sequins, a yarn station that could be the 'piped frosting' designs, syrup on the ice cream sundae/float, r 3-D layers of frosting inbetween layers of cake, and then finally a sprinkle station with real sprinkles! Oh and for those floats, I had a hot glue gun station to glue a REAL bright colored straw to the back to make it look like it was sticking out!

For our final step, we took cake plate tracers and 'glass float dish' tracers, and traced on clear overheads with a permanent marker. Then used strong tacky glue to attach the cakes and icecream floats to their containers.        Ta dah!


Friday, March 2, 2012

Dr. Suess' Fox in Socks drawings & tie-dye socks


2nd graders had some fun with making art based on Dr. Suess' books for his upcoming birthday! First Miss Oetken read the tongue twisting book, Fox in Socks. The students laughed and laughed.  Then I showed them how to make Dr. Suess's illustration of Fox in Socks. I broke it into several easy steps. I even demonstrated it again in enlarged form on the white board. I told the students to draw with pencil lightly so you can erase easier. Then trace over with bold outline with black crayon or marker. Then color in with oil pastel on your orange paper. Have fun making it your own by choosing the colors of socks and whimsical grass. They all did AMAZING. While students were working on this project. I called table by table back to rubberband their socks, while they wrote their name and classcode in permanent marker on a freezer ziplock baggie. I was waiting by the sink with premixed black and orange RIT dye (Orange and black are the school's colors. These are great colors because students can wear them for Dr. Suess's birthday, spirit days, and support their school at sporting events). While the student would hold open the baggie, I would take the rubber banded socks under the water quickly to wet them, then squirt dye on them in the sink, and then quickly pop them back into the students baggie and zip and place on their shelf. Over the weekend I came in and took off the rubber bands, rinsed, and stapled washing machine directions on the baggies and zipped them back up to deliver to the classrooms. Students were VERY excited! How fun. Even the teachers commented on how they loved that I was tying in literacy and tying it back to theme they were studying in the classroom. They put it in their newsletter and told the students they could wear their socks on Dr. Suess's birthday if they wanted to!