Check out what we're studying in ART!

Showing posts with label Egyptian Art. Show all posts

Wednesday, December 7, 2011

Egyptian Cuffs & finishing our table team Life Size Sarcophagus'


3rd graders finished their Egyptian sarcophagus', Egyptian self evaluation, and then made these toilet paper Egyptian cuffs! I told the students DO NOT CUT the toilet paper roll UNTIL it's completely dry. The reason being it will loose it's shape and just flatten out on it's own. So simply paint with metallic gold, decorate and glue with sequins, and let dry. Then give it a spiral cut for the cobra cuff or just s single cut for the normal cuff.


Students finished working on teamwork skills and their tableteam, patterned, life-size sarcophagus', complete with heiroglyphic cartouches, gold metallic paint detail, and then cut them out. We drew straws for who got to take the treasure home!


Friday, October 21, 2011

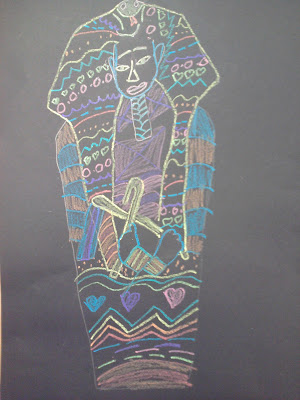
Patterned Egyptian Sarcophagus with Tooling Foil Cartouche


3rd graders are learning about pattern in Egyptian art by making their own patterned sarcophagus. We looked at different Egyptian artifacts such as a Pharoah's death mask, sarcophagus, and neck piece and pointed out pattern in all of them. We talked about what exactly is pattern. Now we're ready to focus on our sarcophagus! First we traced the shape & drew the details with pencil. Then traced all of our pencil lines with construction paper crayons (really bright on dark paper!). After that we filled in with many lines of pattern going horrizontal with LOTS of color! Now we're ready for our cartouche!


Using the heiroglyphic alphabet, students took small rectangles of gold tooling foil, and make a cartouche. Using a pencil and keeping the foil ontop of their alphabet worksheet, they push into the foil to draw the symbols for each letter of their name. Then place a ring around it because "cartouche" mean to "encircle". We talked about how your "ka", or spirit, back in Egyptian times, couldn't go onto the afterlife without having a cartouche on the sarcophagus.

coloring in their cartouche with sharpies

finishing line pattern


using pencil to push into gold tooling foil using heiroglyphics alphabet to create a name cartouche

Making a Egyptian neckpiece to wear when finished with the project. Students used Egyptian
books to find items to draw and decorate it

Saturday, October 1, 2011

Egyptian Art with 3-D Pyramid & fold out Tomb map


3rd graders moved on in art history to our next stop on our timeline: Egyptian art! We watched a Reading Rainbow episode about mummies,the pyramids, preservation of Egyptian artifacts in a musueum, and read the book "Mummies Made in Egypt" where it took us through the process and history of ancient Egypt, even inside the tomb of a pyamid.

Students also learned what was included in the tomb for the mummy to take with them to the afterlife. We looked at pictures, books, and more, of artifacts that the Egyptians would put in the tomb. These included furniture, canopic jars, heart scarab, neckpieces, jewelry, solid gold statues & treasure, amulets (lucky charms), and more!

Miss Oetken's treasure map

 We learned that there were many tunnels that led to 'traps'or dead ends so that if a robber tried to find and disturb the tomb, they might be ill fated! We were Indianna Jones inspired. So after we colored in & cut out our pyramid, we used the other side as a map. We drew a circle in the middle to show the tomb room and then chose treasures/artifacts we studied (looked a pictures in books and visuals projected) to draw in the tomb. Then drew tunnels that led to different trap rooms. We also made a dotted line that showed how to carefully use the safe path to arrive at the tomb.


Monday, January 31, 2011

Lifesize Egyptian Sarcophagus


3rd graders are finishing up their last lesson for our stop in Egyptian art history on our art history timeline! We are combing the skills we've been learning to sum them all up into big teambuilding creative project!


Each table works as a team to practice the skills we've done so far: They have already made their own mini sarcofigus with lots of color and lines of pattern, so they know how to draw one and what it looks like (even though we'll have visuals out to look at again), learned about and made their own cartouche, and worked with Egyptian heiroglyphic alphabet and symbols.

This was also a test of how to work with others and have a positive group experience. I talked about how to work in groups and how to talk about strengths and weakness, how you feel and difficulties in groups. I gave ideas of scenarios and how to handle those, such as: "Would you want someone in your group to say, "Ew! That looks terrible! You're bad at that!" Everyone agreed that they wouldn't like it if someone talked to them like that because it can be hurtful to one's feelings about their artwork and you didn't create a solution to your problem. I explained it's a good idea to ask about strengths and what are some positive ways to make changes and how to go about them. We got off to a great start with a few bumps but ended smoothly. I asked students to raise their hands if at the beginning if they had some difficulties. They raised their hands. Then I asked, did you find solutions to those problems by the end of class today, did things go better later? They raised their hands. I explained that was what the purpose of this activity was:
 How to work effectively in groups.
As for the project, we picked the person with closest birthday to present day and that was the person to be the 'mummy'. We talked about how they needed to 'assume the position' including crossing arms, taking off shoes, and keeping legs 'glued' together. Tracers needed to make sure they weren't tracing feet & showed them again using my projector the visual of the sarcophagus and how it was FLAT at the bottom. We used long sheets of brown craft paper the size of our tables. The students loved that they got to actually lay on the table. First groups designated who was good at drawing what with pencil and drew the outlining details.

 Others who's strengths were coloring/designing, took charge of pattern and color! We used metallic crayons (amazing!) and metallic colored pencils,

added detail with gold metallic paint (super neat!)


 and finished with metallic gold stamp pads and heiroglphics alphabet stampers to create a cartouche to finish it! We are going to draw straws for each table to decide who takes it home to be fair. First I want to hang them in our hallway if there's room!