Check out what we're studying in ART!

Friday, March 23, 2012

Claes Oldenburg Clay Food Sculpture!

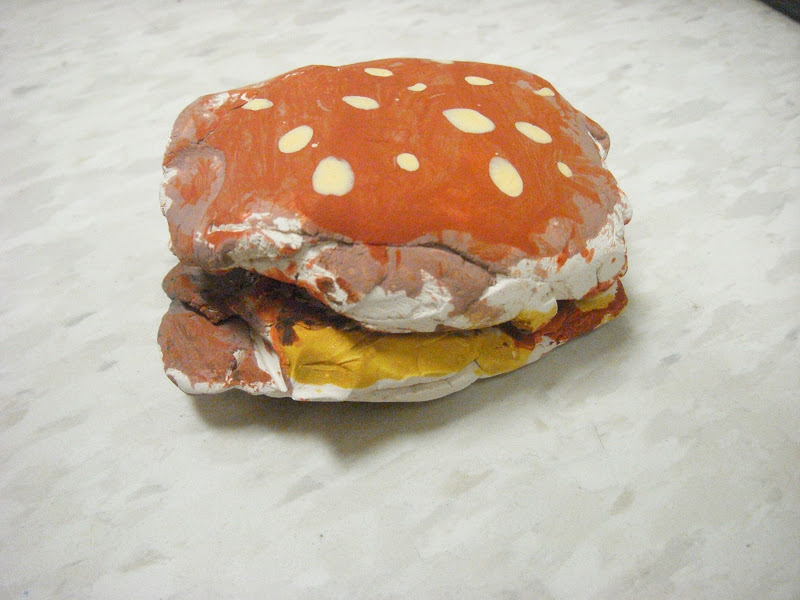
Miss Oetken's blueberry pie, cheeseburger with the works and a club sandwich with olive (modeled the sandwich
after Claes Oldenburg soft sculpture of a sandwich very much like this)

2nd grade reviewed the large scale food sculptures of Claes Oldenburg. We compared and discussed which ones were soft sculptures and which ones were hard sculptures of the different food sculptures. We also reviewed that all were very large scale sculptures. Then we brainstormed what kinds of food we could make. We went through clay techniques and procedure. Next time after they're fired, we're going to paint them and then glue them to a small white paper plate to display our yummy foods! Here are a few examples from last year!

cheeseburger


sausage and pepperoni pizza slice


cupcake with sprinkles


bowl of cherries, bananas and ice cream, fruit bowl:grapesw, strawberries and a banana


Eggs, bacon and sausage


ice cream cone


Here's a hotdog with ketchup and mustard


birthday cake with cherry


taco with all kinds of fixins


Picasso Cubism Self Portraits


4th graders learned about Cubism and the founders of this art movement, Pablo Picasso and Georges Braque (just for the record I totally messed up the pronounciation when I talked about Georges Braque. How do you find proper pronounciations?! HERE!!!--->http://inogolo.com/  Amazing. We looked at a powerpoint all about Cubism (presentations.pppst.com/isms-cubism.ppt). It does a nice job of providing discussion and visual with the class and explains Picasso and his periods (blue and rose) and examples. It also does a nice job of explaing what Cubism really is- a way of making art by combining all different views of an object or person into a painting or a single drawing plane. We looked at painting within the power point and a lot of Picasso's portraits of people.


4th graders learned how to make a distorted Cubist self portrait using black glue to outline and then bright watercolor and pattern! We first traced a skinny rectangle that would become the distorted head/face. Then made a creative line down the middle, making sure to add the nose. We talked about characteristics of Picasso's portraits like the large noses and how the eyes were always uneven because of different views combined. We also talked about making funky creative ears, eye brows, and lashes.


The next classtime, we used our new double tray PRANG watercolors. I showed students how to use the cover with the compartments to mix colors of their own. We also learned a technique to do line work and pattern with watercolor. Pretty cool results!


Thursday, March 22, 2012

Creating Handmade Paper!


3rd graders are finishing their Asian Art unit with learning how paper was is made. We learned how the Chinese invented paper in the year 105 and was made very similar to how we made paper today. Earth day is coming up in April and what a great way to recycle used paper! We talked about safety first and made sure everyone knew what their job was. I mentioned that listening to procedure and rules today was very important because safety comes first.

Numbered stations match with numbered tables so students know where to go with their table

Let me just say, if you've ever made paper with 24 students, it requires A LOT of classroom management. It's organized chaos, so making sure everyone is following those directions is important to keep everyone safe. We have a checklist we discussed on the board and how to use it. Important to stress safety rules:). Everyone did great though following all directions! Go 3rd grade. First students tore their used paper into quarter size paper pieces. I told students we will have 2 class sessions to make a sheet of paper and probably only 2 students from each group of 4 would get finished with their sheet of paper due to only a 45 minute class period-so just have fun!

I cut all kinds of different shapes out of plastic embroidery sheets. They last longer
than screens, are durable and make it easy to create different shapes. We have bananas, hearts, regular rectangular sheets
and many more fun shapes! Becky Brandt, you taught me everything!


All these supplies were needed. First a cup for measuring (small cottage cheese container) to follow recipe, your table's blender (heavy duty extention cords talk about walking safety so no one trips!), a dish tub to contain the pulp and pour the pulp over the screen, resin coated magazine pages (a magazine-tear out one sheet and put name and class at the top with pencil-the paper will pull off easier when dry), sponges to soak up the water from the screen/pulp and to squeeze out the excess in the tub, and of course extra white paper that's old or used/recycled. I had students raise hand when the recipe was ready for paint and for me to pour in a color of their choice. Glitter was also an option. Dump out the extra excess pulp in the garbage from your blender and from the tub to start fresh with a new load of paper.


I told students to "KEEP IT CHUNKY" -like barf. Yes, barf. They were already screaming "EWWW GROOOOOSSS!" so I just ran with it. Keep it chunky-the paper pulp that is! I explained if you make it too thin it won't be thick enough to gently peel off your magazine. I had a good time teasing them pretending to barf as I showed how to pour it onto their screen.


Pour on top of screen, hold over tub and let some water strain out. Then make a barf sandwich...do you love my terminology? This means gently flip over the screen so it's on top and the pulp is the 'meat' and the other slice of bread is the magazine. I had the kids repeat the saying "SCREEN IS ON TOP!"   Gently sponge the top and keep squeezing out the sponge in your tub to get rid of the excess moisure. Gently trace your finger around the edge of the shaped screen. This will help the paper keep the shape of screen you chose. Go back to the screen selection table, gently peel off the screen off the top of the pulp and drop off. Carry to drying rack.


SCREEN ON TOP! Gently sponging and then tracing around edge.


Voil'a! Paper!


Tuesday, March 20, 2012

We scream for Ice cream (and Cupcakes!) with Wayne Thiebaud!


I can't believe it, but I forgot to post about my one of my favorite art lessons from last year where we did the cakes! I'll get to that later...let's stick to this year. We just finished making Wayne Thiebaud "3 Ice Cream Cones" themed art in our own style and "3 Cupcakes". I showed students this clip of Wayne Thiebaud talking about his art. http://www.youtube.com/watch?v=vI_QJ5D9Qm8


For the ice cream waffle cones, we traced a triangle on brown paper 3 times. Then took a brown crayon to make "X's" for the ridges in the waffle cone. Cut out and glue the first cone's point touching the middle bottom. If you do that than you helped manage the even spacing for the other cones! Glue the other 2 on.


Now it's time to start using up those painted paper scraps! What flavor can you make? Start tearing small pieces to make a torn paper collage. Single scoop? Double scoop? Different flavors? Add detail with cutting small sprinkles and garnish with different fruits or toppings!


We're going to spread some glue on the tops if students want, and then add some sprinkles!


CUPCAKES with FAKE FROSTING!:) 


For the cupcakes, I premixed silver paint/water mixture and painted a bunch of gray pieces of paper, dried them, and cut them up for individual "cups" for the cupcake. I showed students outline with black crayon and how trim the paper.  Cut out and glue all 3 cups on your long 12x18 paper. At each table I had a different pre-mixed joint compound mixed with paint. We used popsicle sticks as spreaders. I got this amazing concept from http://elementaryartroom.blogspot.com/2011/01/wayne-thiebaud-creations.html . Then it's time to add some sprinkles before letting them dry. Add sequins for added dimension or 'candy pieces'.


Monday, March 19, 2012

Wayne Thiebaud's Tasty Treats & Creative Confections!


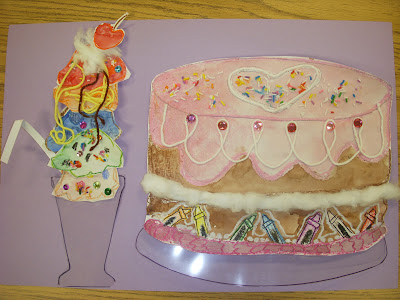
Miss Oetken's Wayne Thiebaud Ice Cream Float and Cake
This is by far one of my very favorite art lessons-but last year got busy and I forgot to post this! How could I?! Well here it is. Wayne Theibaud makes these mouthwatering depictions of cakes, pies, ice cream cones, floats, and many kinds of candy. He likes to give his paintings demension by thickly applying his paint to mimic the frosting on his cakes and sweets. We were inspired by these sweet confections and had a choice at making the float or a cake!


I showed students how to draw with pencil first, a 3-demensional cake using the space of the paper. We talked about detail.


Students then could use metallic crayons, construction paper crayons, and regular crayons to press hard to outline their cakes and decorative frosting.


Next, it's time to turn it into a crayon watercolor resist with metallic watercolors, regular watercolors, and liquid watercolors. HERE's THE COOL PART- in the students' rinsing water container, I added a couple drops of either vanilla extract, orange extract, or lemon extract to make it like a scratch and sniff painting!!! It smelled like a bakery in the art room!!! We loved it.


For the ice cream float, I showed students how to trace the scoops, and they should make 6 different flavors! Add detail with toppings to show us what kind of ice cream it is. Outline with crayon. Then watercolor on top!

Let dry and then the real fun begins! I told students for our 2nd classtime, to cut out carefully. For the ice cream float, assemble scoops on top of each other like a tower. Now it's time to decorate! We had different tasty stations! Whipped cream table was cotton balls that you can gently pull apart and apply with glue for whipped frosting or whipped cream! We also had a candy station that were jewels and sequins, a yarn station that could be the 'piped frosting' designs, syrup on the ice cream sundae/float, r 3-D layers of frosting inbetween layers of cake, and then finally a sprinkle station with real sprinkles! Oh and for those floats, I had a hot glue gun station to glue a REAL bright colored straw to the back to make it look like it was sticking out!

For our final step, we took cake plate tracers and 'glass float dish' tracers, and traced on clear overheads with a permanent marker. Then used strong tacky glue to attach the cakes and icecream floats to their containers.        Ta dah!