Check out what we're studying in ART!

Showing posts with label Asian Art. Show all posts

Thursday, March 22, 2012

Creating Handmade Paper!


3rd graders are finishing their Asian Art unit with learning how paper was is made. We learned how the Chinese invented paper in the year 105 and was made very similar to how we made paper today. Earth day is coming up in April and what a great way to recycle used paper! We talked about safety first and made sure everyone knew what their job was. I mentioned that listening to procedure and rules today was very important because safety comes first.

Numbered stations match with numbered tables so students know where to go with their table

Let me just say, if you've ever made paper with 24 students, it requires A LOT of classroom management. It's organized chaos, so making sure everyone is following those directions is important to keep everyone safe. We have a checklist we discussed on the board and how to use it. Important to stress safety rules:). Everyone did great though following all directions! Go 3rd grade. First students tore their used paper into quarter size paper pieces. I told students we will have 2 class sessions to make a sheet of paper and probably only 2 students from each group of 4 would get finished with their sheet of paper due to only a 45 minute class period-so just have fun!

I cut all kinds of different shapes out of plastic embroidery sheets. They last longer
than screens, are durable and make it easy to create different shapes. We have bananas, hearts, regular rectangular sheets
and many more fun shapes! Becky Brandt, you taught me everything!


All these supplies were needed. First a cup for measuring (small cottage cheese container) to follow recipe, your table's blender (heavy duty extention cords talk about walking safety so no one trips!), a dish tub to contain the pulp and pour the pulp over the screen, resin coated magazine pages (a magazine-tear out one sheet and put name and class at the top with pencil-the paper will pull off easier when dry), sponges to soak up the water from the screen/pulp and to squeeze out the excess in the tub, and of course extra white paper that's old or used/recycled. I had students raise hand when the recipe was ready for paint and for me to pour in a color of their choice. Glitter was also an option. Dump out the extra excess pulp in the garbage from your blender and from the tub to start fresh with a new load of paper.


I told students to "KEEP IT CHUNKY" -like barf. Yes, barf. They were already screaming "EWWW GROOOOOSSS!" so I just ran with it. Keep it chunky-the paper pulp that is! I explained if you make it too thin it won't be thick enough to gently peel off your magazine. I had a good time teasing them pretending to barf as I showed how to pour it onto their screen.


Pour on top of screen, hold over tub and let some water strain out. Then make a barf sandwich...do you love my terminology? This means gently flip over the screen so it's on top and the pulp is the 'meat' and the other slice of bread is the magazine. I had the kids repeat the saying "SCREEN IS ON TOP!"   Gently sponge the top and keep squeezing out the sponge in your tub to get rid of the excess moisure. Gently trace your finger around the edge of the shaped screen. This will help the paper keep the shape of screen you chose. Go back to the screen selection table, gently peel off the screen off the top of the pulp and drop off. Carry to drying rack.


SCREEN ON TOP! Gently sponging and then tracing around edge.


Voil'a! Paper!


Monday, March 5, 2012

Asian pinch pot Teacups


3rd graders learned about ancient tea drinking traditions and rituals. We also looked closely at the shape and how they are elaborately decorated with symbols of their culture. First of all the teacup were fairly small and they didn't have a handle! They have a small 'foot' or base on the bottom. First I had to break the news that yes Model Magic is not waterproof and we couldn't actually drink from these cups. But we got over that in a hurry and were excited to decorate and design our cups!


Each cup was made with one small classroom package of white model magic. I tell students to pull off a quarter coin size piece/ball of clay. Put that to the side for the base. I show students the class pinch pot technique with their thumb. Then I show the technique of making a thick coil or a 'snake' with the quarter sized piece for the base/foot. Form into an "O" by connecting the ends of the coil. Just gently set the cup on the coil. Then write your name and class code on a small slip of paper and set cup on top, then on shelf. Just to give you an idea how big they are, they're about 2 inches across.


 Next time the clay will be dried out and hardened (it's never rock hard because model magic is soft white air-dry like dough) and let students it's not like fired clay, o be careful. Now transfer your name and class with permanent black marker on the bottom base. Now it's time to design your cup! Use permanent sharpies, Chinese characters, and symbols to decorate the outside edge.


Student work...check em out! WOws.


Japanese Sakura (cherry blossom) Trees


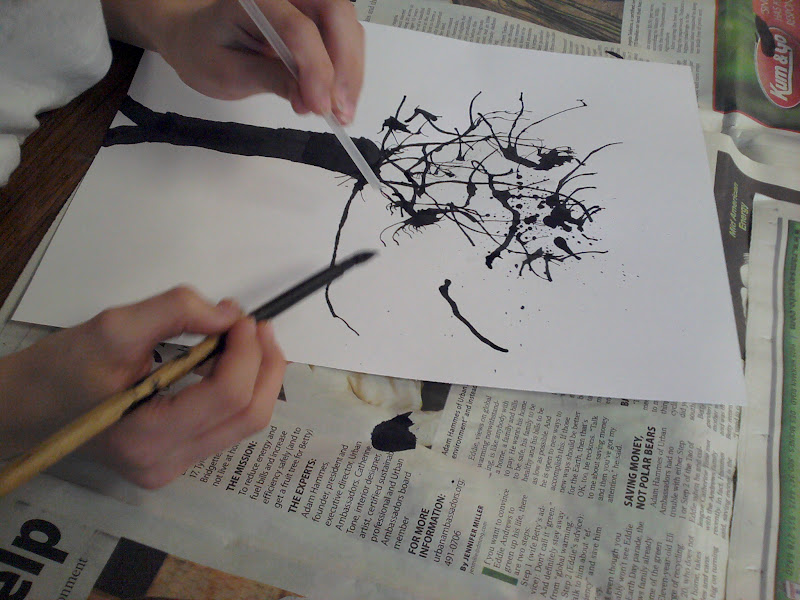
3rd graders practiced calligraphy and made these ink blown Japanese sakura (cherry trees). I showed how you first paint the trunk with the bamboo brush, then made a tiny dot or mini pool of ink on the edge of the trunk and with your other hand holding onto a straw blow the ink quickly before it dries. The ink is blown into a thin stream to make branches. I even showed the students how to make a branch of another branch by making, again, a tiny little dot and quickly blowing air through the straw to make extend the branch. Keep making branches and blowing (not sucking!) through the straw till you're satifyed with your tree. Next time we'll attach little pieces of pink tissue paper by rolling around the eraser end of a pencil, adding a dot of glue, press down on the a branch to attach the blossom, and twist to give it a blossom shape.


student with bamboo brush and
straw blowing branches

After attaching blossoms, I cut small squares from styrofoam printing plates. Using a pencil, students can 'create' a character to represent their name or choose a character that represents who they are (ex. patience), and press into it to create a relief printing plate. Then using a small brush and some red paint, paint the surface lightly (less is more!) and then press the plate onto the bottom corner area for their 'red seal'.


 This reminds me of the beautiful cherry blossom tree that blooms on University of Northern Iowa campus! I bet it's still there. In college we were given an assignment to use a textured piece of roofing paper and pastels to make a landscape drawing for a studio art class.This is mine from college, just thought I'd share.


Asian Art! Coffee Filter diffusing watercolor FANS!


3rd graders made these fans while watching "Between the Folds". We looked at important symbols in Asian culture, rituals, and in art. Some of these symbols were the bamboo branches, the sakura tree or cherry blossom trees/branches, chinese dragon, calligraphy, and koi fish. We looked at visuals (making sure scratch paper was underneath) drew with pencil first if needed, then went over it with black permanent Sharpie markers. I told students to fill in with crayola waterbased markers for the background. I will be spraying these fans down with water. Everything that's done with permanent marker will stay the same, everything with waterbased markers like Crayola markers, will blend and blur together like watercolor (the wetter it gets the more it blends and looks like watercolor!). With that being said, I advised students to fill in their permanent color drawings and turning it into a silhouette or leaving it open and just coloring with waterbased markers over the top. Don't draw with the markers, fill in with the markers! Check out some of these amazing fans!


Students work- a cherry blossom branch-after spray


student work-beautiful watercolor effect!


spraying down after students finished coloring-pre watercolor phase!


Adventures in Asian Bamboo Brush Calligraphy!


3rd graders after working on their Asian (Chinese/Japanese) Model Magic teacups and coffee filter fans, tried their hand at bamboo brush calligraphy-an ancient artform that's been around for many, many centuries and takes many years to perfect. We even watched a wonderful clip from Reading Rainbow that takes you on a step by step video and explanation of how calligraphy works in a calligrapher's studio. From the brushstrokes to the final individualized red seal or stamp that acts as a 'signature' on a lot of Asian art, especially calligraphy. 


 Students were given authentic bamboo handle brushes and ink. Students were encouraged to take home the Calligraphy handouts that had instructions on how to hold the brush, the order of strokes, and examples of characters with English translation above. They also took home their practice calligraphy to show off. Students enjoyed the challenge and exploration.


Oh! And I can't forget, my Buddah Board! So this is one of my favorite toys. It's a water sensitive board that comes with a stand that has a water basin to dip the bamboo brush it comes with. When water touches the surface it turns black like ink. If students have free time they can come up to my desk and try it. I tell the students who are in line to count to 25 and then it's the next person's turn. What happens is the water evaporates from the board and  it 'erases' itself! Then it's ready for a fresh start. The kids love it! No ink allowed though and clean hands have to be a must!


Friday, March 2, 2012

Asian Art with Origami endeavors!


T-Rex dino origami

3rd graders are just starting our Asian art unit on the art history timeline! We started first by making  watercolor effect chinese fans out of coffee filters with cultural symbols on them. While we worked on them I played the DVD called "Between the Folds". It's a documentary all about the art and science of origami. Totally facinating and the students are majorly wowed. You'll constantly hear "COOOOOOL!" or "WHOOOOOOOOOOOA!". Kinders even are wowed. I said it was an introduction into what we'll be working on next time....ORIGAMI!


Well to make this complex task a little simpler, I finalized the choices down to 3 different dinosaurs (that range from easy to medium difficulty) and a super simple 'sailboat/yaht' and a simple 'jumping frog'. With origami the 3rd graders are really excited because it looks cool, but as soon as we start, the directions are more difficult and take time to read. Frusteration breaks out as soon as we start. So we had a short discussion about what's going to happen. Are we all going to be expert folders in this class period...No. They agreed. Is it going to take time? Yes. They agreed. Are you going to have problems and questions? Yes. Absolutely, they agreed.  I explained that I had many challenges with learning how to do all of these. I wanted them to try them on their own and I would be rotating in a circle table, to table answering questions. What could they do in the mean time? Ask others for help. If they saw that someone was successful, teach each other! I said, I want this to be fun and maybe you have another way of making your own origami! Then, the stress was taken off and the students were working independently.

a rainbow of origami colors

 3rd graders first finished making their Asian tea cups (another post) then they could grab 3 pieces of colored origami paper. I had extra plain white pieces of paper in case they wanted to make more! Then they go over to see what 3 designs they want to make and grab the corresponding directions. I also had out colored Sharpie markers that they coud use to add pattern to jazz up their origami! Also they can add detail if desired. We ended up having a blast and talked about how we had hurdles we had to overcome but enjoyed the out come and challenge!


Tyrannosaurus Rex dinosaur


Brochiosaurus


Stegosaurus

jumping frog


Friday, March 11, 2011

"Between the Folds" on PBS all about origami!

Asian Art is coming up fast and I happened to stumble across this award winning independent documentary film called "Between the Folds" all about origami. Read the synopsis...it's quite intriguing!Synopsis-short and sweet!


Priview/trailer:
Here is a preview of the film. I heard it's very entertaining for all ages! Even the young ones! I'm going to check it out.