Thursday, April 19, 2012

Andy Warhol's Cats and Soup Can Ink Blot Prints


Andy Warhol is not only famous for screenprinting in a repetative manner, but also for his illustrations and advertisements early in his career. He discovered a blotted line technique where he would draw with wet ink and before it dried, lay a piece of paper on top of the wet print and pulling a textured line print. He enjoyed how it wasn't perfectly uniform and produced a unique result.


I first drew a reproduction of Andy's cat and soup can that was very simplified. Then made copies. The key to pulling these prints is having watered down ink/paint, working quickly, and using just the tip of the bristles of a plastic bristled brush. Work fast or it might dry on you. We talked about this and what to do if it does. Put a plexi glass plate on the top of the photocopy. Have a piece of construction paper or white drawing paper with your name on the back handy. After tracing over with wet ink, quickly lay the paper on top. Rub the back then pull away from the plate to pull your print. After pulling the print, I told students they could look at Andy's prints for inspiration or simply create a new design!


Art Careers Exploration!: Artists Talk About their Professions & Requirements in the 21st Century


What an excited, eventful day we had in the art room! I surprised my 4th graders with celebrities! Real, successful, and unique artists from Des Moines! I asked Kristian Day and Jon Baldwin from the Des Moines, Iowa area to come and talk to my students about how amazing their jobs are, but also talk about what it really takes to be a successful part of the art world in the 21st century (especially with it's challenges and competition).

Kristian showing the students his Super 8 camera a vintage model that he loves to use and explains how it works. You might have heard of the Steven Spielburg 's movie, "Super 8" which is named after this type of camera.

Kristian Day is a successful independent film maker who has made some very successful documentaries. They have taken the Des Moines area by storm and sweeping across the nation! I attended a screening of one of his documentaries at the Des Moines Art Festival this past summer called "Hybrid Pioneer". It follows the life and eye into the unique style and life of the area artist Brent Housenga (more about Brent: http://www.brenthouzenga.com/  and clips of Kristian's documentary). Kristian not only films but he does all the sound and editing. He is a composer and likes to take clips from his film and others and compose music to produce an artistic installation like experience. Absolutely amazing.


Most recently his documentary called "Capone's Whiskey: The Story of Templeton Rye" which is the history of  Iowa's role in the illegal moonshine production and creation of the famous brand Templeton Rye during the rich history of prohibition. Kristian actually got people, from over generations of staying quiet, to reveal their most intimate stories of famous history that had never been uncovered till now! You might have heard PBS having a documentary film series called "Prohibition". PBS aired Kristian's documentary right after it!!!! I watched it on PBS the first time. Then Kristian invited us to his documentary's premire at the Fleur Cinema and Cafe where many of the people interviewed were also attending to see it on the big screen. 

Kristian explained how filming works and how sound is recorded. He also passed around mini posters of his new film he's working on with a friend and film maker called "Kung Fu Graffiti"  (http://www.kungfugraffiti.com/about.html) and mentioned he would love to do a screening here in Grinnell! He travels all around the world to film festivals to showcase and share his films.


Jon Baldwin is a successful visual artist in Des Moines. We works in all different kinds of media from drawing to painting to printing. He's very versatile. He shows in galleries whenever possible and has a thriving buisness of selling his visual productions. Jon also does commissions for buyers. Jon really did a great job of expressing how important passion is in your art and staying true to yourself. Don't be hurt by others when they say when they don't like your art. Take it in and take something away from it to learn about what you do. However, sometimes you have to cooperate and make changes within the way you make your art for a customer to make them happy. It is a business and you sometimes have to sacrifice your personal ideas to make your customer happy to create a good reputation. However, don't loose yourself and change to conform to everyone's liking. Jon explained you don't have to have the highest quality of art supplies to make successful art. He mentioned he uses all kinds of media including the same brands that we use in our art classroom!

Jon knew we had been studying amazing artists like Vincent Van Gogh and wanted
to point out his striking resemblance along with how he's inspired by other artists' styles


students looking at Jon's art that was inspired by childhood interests
Both artists explained how important is to keep learning, asking, inquiring, exploring, and discovering in their field. They are lifelong learners. As soon as you stop wanting to learn and grow, you loose out on opportunities to be successful and overcome the competition. Artists are hardworking who don't ever stop wanting to be successful. Passion is their main drive to work through obsticles and creativity is what helps them overcome these obstacles. What inspired my students was the fact both artists said their career decision was made and inspired by art during their elementary years of childhood! Most of their art comes from concepts they discovered and loved as a child. I agreed with both artists when they said "Artists are really just kids at heart. We love to have fun through creating and sharing our ideas with others. Art is the way we communicate."


students asked Jon and Kristian for autographs after holding discussion with the class
What was more amazing than anything was the fact that my students held great discussion and questions with our artists. They asked thought provoking questions about their jobs and it was so great to see the critical thinking skills and inquiring ways of my students. I would jump in and ask my students questions back and also ask questions in relation with 21st century skills. Here's more information about Kristian.   http://www.kristianday.com/

Wolf Kahn Chalk Pastel Trees with Kinders!

http://artasticartists.blogspot.com/2011/03/wolf-kahn-analogus-color-family-pastel.html

I have another previous post about this, but it's much easier than you think! I tell my kinders to write their name on the back of a big 12x18 piece of drawing paper at their tables. I count them down to encourage them to focus on getting their name on the back. Raise your hand if you're ready for directions! Everyone's hand is in the air, next step is to pick out 6 colors. Your magic number is 6. Pick out 6 chalk pastel from your container. I'll count ya down, you pick out 6 and have them ready. I start from 15. 15, raise your hand if you have your pastels, 14, have them out and read, 13 pick out your colors, 12, 11, 10......and I continue to count down until all hands are in the air.
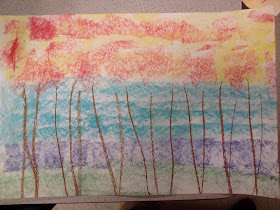
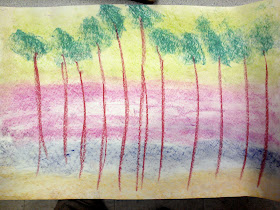


I have then on the white board where everyone can see, a piece of 12x18 white paper taped. I have my 6 pastels ready. Okay, pick out your first color and hold it in the air. 5, 4, have it ready, 3, 2, and 1: Watch what I do: (I demonstrate how there's 2 ways of using the chalk pastel. The tip and the side. I tell them we're going to use the side of the pastel for a lot of the project. I show them and count them down from 15. 15, move side to side, 14, side to side, 13 side to side, ........ After we get a new color for each section, it's time for the fun part! Now it's time to smooth side to side, use the tips of your fingers on 1 hand. 15 smooth side to side, 14, smooth side to side, 13, side to side, moving up slowly, smoothing side to side.......now we're going to get ready with a new color and then hold it in the air in 5, 4, 3, 2, and 1. This time using the tip watch to see what I do to make the trunks: *do the downward motion strokes for trunks* Fast! Fast!Fast! Say it out loud! *kids fast, fast, fast* as they make the marks on their paper. Okay done in 5, 4, 3, 2, hold your color in the air. Okay, get your last color and hold it in the air in 5, 4, 3, 2, 1, watch. Using the side *demonstrate* we're going to make the tops of the trees to finish our Wolf Kahn pastel. Watch how I do it to fill the top area. *Demonstrate* Finish up from 15, 14, 13....... put your pastel down and your hand in the air, and the other in the, wave'em around like you just don't care, heeeeey hooooo.( I like to make it fun to listen:) ) I will call tables to wash hands, then dry and the table captain will wash your table and dry. Put your drawing on your chair and point to places where your table captain needs to wash and dry.

Try this with your kinders! It works great! (more pics to come!)

Wednesday, April 18, 2012

Congrats to those accepted into the Elementary Art Show!

CONGRATULATIONS TO THOSE ACCEPTED INTO THE SELECTIVE ELEMENTARY ART SHOW 2012

Sunday, April 8, 2012

Jellyfish with Kinders!


So I have been using Pinterest and it's fun to see those of you who enjoy lessons from my blog! I keep seeing my photos popping up when I'm exploring different art lessons! I like to look on Pinterest for inspiration and then figure it out myself or use an idea then make it my own by putting my own twist on it.

Here's how I did the jellyfish: I first showed them my example and talked about jellyfish and it's tentacles.  We also looked at a photo of a jellyfish to understand it's colors. I think I'll show a video clip of different kinds and how they move in the water when we're finishing next time.  There was a lot of prep for this art lesson: cutting tissue paper into small squares enough for alllll my classes, getting the modge podge mixed with water in styrofoam bowls (easy throw away), cutting up of the white strips of paper, wrapping all the styrofoam bowls with Seran wrap/plastic wrap, and cutting all the strips of different colors for the tentacles. 

After you get that done here's the different steps: I have the students go to their seats first, write their name and class code on a sticker. The student peels off the sticker, walks up to the table to get their plastic wrapped bowl, sticks the sticker on the underside of the bowl. I showed students how to 'paint' on the stinky modge podge on one side of the paper, place it on the top of the bowl, paint on the top of the strip, and smooth it down with your hands. Get messy. Keep placing the white strips in a radial design covering the plastic wrap. Make sure to paint modge podge on top and smooth down. Then get around 6 or so different colored squares of tissue paper. Lay on top of the white strips and paint Modge Podge to seal and smooth down.

When it's dry, pull plastic wrap carefully away from jellyfish. Throw away plastic wrap. Keep bowls for another use. Poke two holes in the top for fishing wire/string to hang. Attach tentacles with dots of Elmer's glue to the underside. Crumple the tentacles for added texture.


Centers with Kinders: "Seen Art?" creating a personal masterpiece!


I decided to try out this center based learning. For art I felt it was an exploratory station based art lesson. Centers are said to provide individual/independent based learning where students use their own problem solving skills to acheive high levels of Bloom's Taxonomy. For kinders, I read the book "Seen Art?" which is a book all about a boy who's trying to find his friend named "Art" and wonders upon the MoMA (Museum of Modern Art) in New York City. He keeps trying to tell the people from the museum that he's looking for "Art" and they think he's talking about art in the art museum, not his friend! The illustrations (by the famous Jon Scieszka) incorporate real photos of all kinds of famous masterpiece art works from famous sculpture, to famous paintings, prints and even examples of famous historical artistic film.


For our art lesson, I told kinders to design a masterpiece of their own exploring different types of materials. How are you going to use these materials? I made copies of a "masterpiece" frame I drew and then at the top I typed "We read the book "Seen Art?" by Jon Scieszka and Lane Smith. We looked at famous masterpieces from the MoMA (Museum of Modern Art). We then went to different stations/centers to create our masterpiece." I designed different 'centers' stations that had different and unique types of materials. It was up to the student to decide how they wanted to use this material and how to incorporate it into their masterpiece.


Yes this student did his work upside down but he came up with the concept
of making his own "Starry Night" using these materials!


perhaps a self portrait
 Here are the different types of 'centers' I did. Markers and color changing markers, liquid watercolor in spray/spritz bottles, crazy cut scissors with scrap construction/painted paper and glue, scissors with tissue paper box with glue, crayons/glitter crayons, and colored pencils/metallic colored pencils. I instructed students to use whatever they wanted however they wanted to create their masterpiece. Listen for the timer, 3 minutes at each center and follow the numbers of tables. We rotated from station to station and when we were done we kept them out and looked at everyone's.

Friday, March 23, 2012

Who's coming to our Artist Dinner Party?


I love this art lesson and so easy to do, fairly inexpensive, and goes with our Claes Oldenburg clay food! It does take a bit of patience and prep tacking the plastic silverware and plate down to a sheet of 12x18 drawing paper. I don't glue the fork's handle down, just the prong part, so that the students can sneak the folded paper napkin square under the fork and glue it with Elmers glue to the paper! This is a great lesson for the end of year to review famous art and artists. I put up visuals using my projector and students got to pick which masterpiece and artist they wanted to have at our artist dinner party! I put up about 6 different artists and kept other posters out as well- but nothing way too complex to try to make your own. I told students to write the artist's name in the bottom corner so they would 'know where to sit'!
Our Claes Oldenburg food on our famous artists' place setting for our Artist Dinner Party!


Claes Oldenburg Clay Food Sculpture!

Miss Oetken's blueberry pie, cheeseburger with the works and a club sandwich with olive (modeled the sandwich
after Claes Oldenburg soft sculpture of a sandwich very much like this)

2nd grade reviewed the large scale food sculptures of Claes Oldenburg. We compared and discussed which ones were soft sculptures and which ones were hard sculptures of the different food sculptures. We also reviewed that all were very large scale sculptures. Then we brainstormed what kinds of food we could make. We went through clay techniques and procedure. Next time after they're fired, we're going to paint them and then glue them to a small white paper plate to display our yummy foods! Here are a few examples from last year!

cheeseburger


sausage and pepperoni pizza slice


cupcake with sprinkles


bowl of cherries, bananas and ice cream, fruit bowl:grapesw, strawberries and a banana


Eggs, bacon and sausage


ice cream cone


Here's a hotdog with ketchup and mustard


birthday cake with cherry


taco with all kinds of fixins


Picasso Cubism Self Portraits


4th graders learned about Cubism and the founders of this art movement, Pablo Picasso and Georges Braque (just for the record I totally messed up the pronounciation when I talked about Georges Braque. How do you find proper pronounciations?! HERE!!!--->http://inogolo.com/  Amazing. We looked at a powerpoint all about Cubism (presentations.pppst.com/isms-cubism.ppt). It does a nice job of providing discussion and visual with the class and explains Picasso and his periods (blue and rose) and examples. It also does a nice job of explaing what Cubism really is- a way of making art by combining all different views of an object or person into a painting or a single drawing plane. We looked at painting within the power point and a lot of Picasso's portraits of people.


4th graders learned how to make a distorted Cubist self portrait using black glue to outline and then bright watercolor and pattern! We first traced a skinny rectangle that would become the distorted head/face. Then made a creative line down the middle, making sure to add the nose. We talked about characteristics of Picasso's portraits like the large noses and how the eyes were always uneven because of different views combined. We also talked about making funky creative ears, eye brows, and lashes.


The next classtime, we used our new double tray PRANG watercolors. I showed students how to use the cover with the compartments to mix colors of their own. We also learned a technique to do line work and pattern with watercolor. Pretty cool results!


Thursday, March 22, 2012

Creating Handmade Paper!


3rd graders are finishing their Asian Art unit with learning how paper was is made. We learned how the Chinese invented paper in the year 105 and was made very similar to how we made paper today. Earth day is coming up in April and what a great way to recycle used paper! We talked about safety first and made sure everyone knew what their job was. I mentioned that listening to procedure and rules today was very important because safety comes first.

Numbered stations match with numbered tables so students know where to go with their table

Let me just say, if you've ever made paper with 24 students, it requires A LOT of classroom management. It's organized chaos, so making sure everyone is following those directions is important to keep everyone safe. We have a checklist we discussed on the board and how to use it. Important to stress safety rules:). Everyone did great though following all directions! Go 3rd grade. First students tore their used paper into quarter size paper pieces. I told students we will have 2 class sessions to make a sheet of paper and probably only 2 students from each group of 4 would get finished with their sheet of paper due to only a 45 minute class period-so just have fun!

I cut all kinds of different shapes out of plastic embroidery sheets. They last longer
than screens, are durable and make it easy to create different shapes. We have bananas, hearts, regular rectangular sheets
and many more fun shapes! Becky Brandt, you taught me everything!


All these supplies were needed. First a cup for measuring (small cottage cheese container) to follow recipe, your table's blender (heavy duty extention cords talk about walking safety so no one trips!), a dish tub to contain the pulp and pour the pulp over the screen, resin coated magazine pages (a magazine-tear out one sheet and put name and class at the top with pencil-the paper will pull off easier when dry), sponges to soak up the water from the screen/pulp and to squeeze out the excess in the tub, and of course extra white paper that's old or used/recycled. I had students raise hand when the recipe was ready for paint and for me to pour in a color of their choice. Glitter was also an option. Dump out the extra excess pulp in the garbage from your blender and from the tub to start fresh with a new load of paper.


I told students to "KEEP IT CHUNKY" -like barf. Yes, barf. They were already screaming "EWWW GROOOOOSSS!" so I just ran with it. Keep it chunky-the paper pulp that is! I explained if you make it too thin it won't be thick enough to gently peel off your magazine. I had a good time teasing them pretending to barf as I showed how to pour it onto their screen.


Pour on top of screen, hold over tub and let some water strain out. Then make a barf sandwich...do you love my terminology? This means gently flip over the screen so it's on top and the pulp is the 'meat' and the other slice of bread is the magazine. I had the kids repeat the saying "SCREEN IS ON TOP!"   Gently sponge the top and keep squeezing out the sponge in your tub to get rid of the excess moisure. Gently trace your finger around the edge of the shaped screen. This will help the paper keep the shape of screen you chose. Go back to the screen selection table, gently peel off the screen off the top of the pulp and drop off. Carry to drying rack.


SCREEN ON TOP! Gently sponging and then tracing around edge.


Voil'a! Paper!