Check out what we're studying in ART!

Thursday, March 31, 2011

San Diego Art Museum made a great ending to my spring break!


One of our last stops on my awesome Spring Break with my friend Kate Mc Hugh in the OB (Ocean Beach area and we've been friends since college) was the San Diego Museum of Art. I saw some interesting pieces and an amazing exhibition of Japanese woodblock prints (we're studying Asian art right now!). But I am a slave to the museum art gift shops and so excited to spend my  money on art education finds that are a lot of fun!! So I found this remarkable children's book that I've never seen before, called "The Boy Who Bit Picasso". I LOVE IT!!! It is a young boy, and son of famous photographer  Lee Miller, and talks about the relationship between his family, Picasso, and other artists that would hang out with the family. It was so neat to hear and SEE first hand accounts and personal stories between Picasso and 'Tony', the son of the photographer. Lots of personal pictures and relations to his famous pieces of art and personal artworks made specifically for Tony and his family.


Here is a picture (above) of the summary of the book. The great thing about the book is that it's meant to be read by young readers! And the pictures and colors are amzing. Really cute and I really enjoyed reading this. I'm hoping on a free day in art near the end of the year to read with the document camera, have the students free draw and listen to the story.


Here are some pictures from the book with detail about first hand accounts of growing up with Picasso as a friend. I know what you're thinking. Why is it called 'The Boy Who Bit Picasso'?? It explains in the book how Picasso loved playing with Tony and they were on the floor pretending to act like fighting bulls and they got a little rough and Tony bit Picasso and PIcasso bit him back!! Hilarious friends. It really gives you an idea of how Picasso really loved children and believed in children being artists and remaining a 'child at heart' to identify with art and creativity. I love his famous quote: "Every child is an artist. The problem is to remain an artist once we grow up".


Homage to the Square. Josef Albers & I. Another great children's book about
Joseph Albers life and his art "An Eye for Color"

Kate and I trying to pull off some creative
photography by the beach

Trompe loeil! San Diego Museum of Art


Trompe-l'eoi photo upclose! WOw

Evening art gallery Chihuly knock offs:P

perfectly pedicured toes hittin the beach and tides coming in!

Kate and I on the OB beach just 5 minute walk from her apt!!

art this way!! Ok, kind of.


Thursday, March 24, 2011

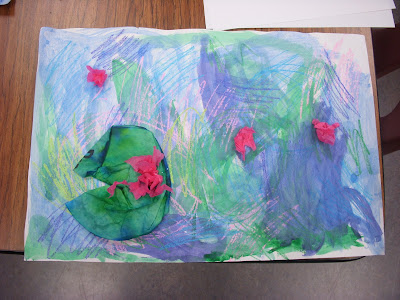
Wonderful Waterlilies: Monet's 3-D waterlilies


Voila! A student's Monet Waterlilies with a 3-D touch!


4th just finished up with Impressionism and ending where we started....with Monet! We first looked a very beautiful poster, given to me by the one and only amazing Becky Brandt, and other visuals of Monet's studies of various waterlilies floating on the water. We looked at the different colors in the water and reflections we saw. Students pointed out pinks, blues, greens, yellow greens, lavenders, magentas, purples and more. The result looks complex but the process was fairly simple!

Students first took a 12x18 heavy weight sulphite piece of a paper and used crayons to make scribbles using the colors we discovered in the reflections in the water (note above colors listed). Then using a green, making 3 green ovals for lily pads. Then after crayon, students used blue, green, purple and a little bit of pink watercolor in areas and blended them. I explained to "keep it light to keep it right" "lots of water little bit of paint" to really get those nice blends. Of course I demo-ed everything at the beginning of class so students knew how to go about these processes.


Miss Oetken's Monet:)


check out another students beautiful way of adding lots of
pink tissue to make a giant lily on the lily pad!


Before they left, I said to count to 10 and scribble with green and blue (if they wanted they could add a little purple) Crayola marker and write their name in permanent marker with their class on a.....COFFEE FILTER! Yes! Then I put them all in the drying rack and sprayed em down to get that beautiful, blended, watercolor look.


student using their pencil to wrap a small piece of pink tissue around for the lily. Then while holding the tissue wrapped around the pencil, the student adds glue to the end and attatches it to the paper and twists, lifts up leaving a lily


For classtime 2 students took their big tye dyed coffee filter, folded it in have, then made a cone or 'teepee' shape, then smashed it down (you don't have to do it this way I explained if they had another idea) and glued it down on the page where they wanted. Then take some pink small pieces of tissue paper for the lilies. We wrapped them around a pencil eraser end, then added a dot of glue on the paper where it would stick, pressed the tissue wrapped end of pencil to the glue, twisted while pressing, and lift up! Instant blossom! Add more to one area if you want to make a more bountiful blossom waterlily.


student work
Add pink tissue paper lilies to your green crayon lily pads to give it a finishing touch! Tah Dah! Check out how beautiful these turned out! Check below:)


My wonderful tissue paper tear-ers! Woo go team!


Wednesday, March 23, 2011

Romero BRITTO! Adventures in COLOR and PATTERN!


 Romero Britto is a modern up and coming artist & painter becoming more of a household name in the artworld more and more everyday! Infact, I was just watching tv (reality tv that is, I know sad:/ )and low and behold, I spy with my little eye a Britto print in the background hanging on their wall!!! My friend Becky, another art teacher told me a while back to check him out....very intriguing style! He combines pop art, cubism like style, along with graffitti like interpretation! He's a Andy Warhol, Keith Harring, and Picasso all rolled in one! Based on his artwork you can definately pick out bold characteristics and elements and principles of art. Bold line. Bright colors and combinations of color. Pattern. All things my students should know!


I had my students look at the visuals projected on my white board and pic whatever subject they wanted. Then we talked about what we saw in the famous paintings. Color. And he also divided the drawing into sections with bold line and in each section there is a different color with a colored pattern. So I told me students to do the same. Draw one of the subjects. Divide into sections with pencil (so you can make changes and erase!). Then use crayon to trace over pattern only. And for stripes, do every other because....we're going to do watercolor over the large areas! It then becomes a watercolor crayon resist. Then, when dry, use black acrylic paint to make bold lines where you sectioned off the areas of pattern and color with pencil previously. Voila! Britto like paintings!


Romero Britto famous paintings and prints below


My students are just starting their Brittos, but I can't wait to show the finished products!
 Look at the great start they have! (look below!)

apple

heart with wings

heart with wings
apple


heart

cat

butterfly

heart


Monday, March 21, 2011

Chihuly 'Glass' BOWLS and Forms!


1st grade is making Chihuly 'Glass' bowls/forms!! We looked at how Chihuly makes his beautifully colored glass bowls, sculptures, and alien like forms. So beautiful!  I showed students how he likes to put some of his glass bobbles in boats to float around  in the calm waters to have the sunshine show the brilliance of the colored glass & reflect off the water. 5th grade grade concentrated on making glass 'blossoms' like Chihuly's that cover the ceiling of the Bellagio Hotel and Casino in Las Vegas but we used another method in making those. I'll get to the different options later! Here are some finished Chihuly bowls. Students simply used colored permanent Sharpies to add lots of color, line, and pattern on clear Graphix Shrink sheet (very close to clear shrinky dinks). It's basically a shrinkable, clear plastic sheet that thickens when it shrinks.


After students applied these elements and principles of art, I took them home, heated the oven to 300 degrees and placed a small glass in the middle of the sheet on a cookie sheet that you don't care if sharpie gets on it :). Then watch as the Shrinky dinklike sheet wraps around the bottom of the glass, but work fast. I then yank it out of the oven using pot holders, and push and mold it around an old mug to quickly mold it to keep it's shape before it cools. You have to work fast and be wearing pot holders, but they turn out awesome (more examples at the bottom of the page!).


students using markers to apply color and pattern

adding pattern


adding lots of color and line!


I had students work on tablecloths just incase it went off the table
My friend Jenny who is an elementary art teacher as well, found a great inexpensive way to make Chihuly 'glass' forms. She has students use Sharpie markers on solo clear punch cups. She then puts it in a toaster oven on BROIL for just seconds! Then pulls them out fast! When you take them out you have to let them cool.
student cups from Jenny:)


Voila! After being in the oven it creates a glass like form.

String them together and hang them as one of chihuly's chandiliers near a window
where there's lots of sun light to shine through and bring out the bright colors!

...more glass forms from SOLO clear punch cups

 Here are some of my students 'glass' Chihuly BOWLS below!


Here's what my 5th grade did for our Chihuly unit. We looked at the famous Bellagio ceiling and it's blossoms and tried our own take on the concept. We used clear, empty, plastic flimsy water bottles, cut them into different pieces and cut slits into the pastic pieces. Then using some scissors as a pair of pliers, hold on to plastic piece with them and hold them in front of a heating/embossing tool or gun. The heat makes the plastic piece almost dance as it's warped by the heat. We of course go over safety rules before any of this but the students see that it's almost like 'blowing the glass' before their eyes!


Then mixing paint and gloss medium together so it has a transluscent quality, paint plastic forms and let dry. Then we add all kinds of colored wire and straws with a glue guns to make some funky looking flowers and blossoms. Each piece can be looked at as a sculpture or strung together as a multi media installation!