Thursday, December 22, 2011

12 Dogs of Christmas with Kinders-decorate a dog!


Kinders loved the book "The 12 Dogs of Christmas". I basically sang it to them. It follows the song except changes the words so they correspond with different breeds of dogs doing funny things. For example, "On the 10th day of Christmas my true love gave to me, 10 dalmations dancing..." and has these hilarious photos of dogs doing funny things and then the artist 'drew' clothes on top of the photo. We decided to do the same! Except I printed off regular photos of dogs, then suggested funny things to add with crayon and oil pastel. A scarf? A sled? A santa beard? Ice skates? Mitten on the paws? Tutus? Ballet shoes? Hat? Candy cane? The students laughed and laughed with the story and the project. A great project to end before the big winter break!


Nom, Nom! Freshly made paper Christmas Cookies!


My private art students and I had a great time doing this project. She's already uber  talented and I thought this would be a great thing to use to decorate at home for the season. First we painted just the edge around a paper plate. Then when dry, glued a decorative doily to the plate.


All we did was trace around cookie cutters (metal ones) or premade tracers onto manilla 'cookie colored' paper or brown 'gingerbread' paper-cut out. Then we used oil pastels to 'frost' and decorate. They for an added touch (to me it really made it fun), we used fabric paint to 'pipe' the frosting on. Before the piped frosting dried, we sprinkled clear 'sugar' glitter along with some other colored ones for sprinkles and also drew some sprinkles on with the oil pastels. We also used sequins and jewels for 'candy pieces' to decorate. Then overlap a bit and glue to the plate. Done!


Cool and Warm color family Snowflake Watercolor Snowmen!


 Once again we did the cool and warm color family snowflake snowmen. We talked about the color families and then chose 2 colors from the family of our choice. Students reviewed the dos and don't of watercolor painting and how to do the wet on wet technique to get beautiful blends! After a class of them drying, we cut out our tracers of the small circle for the head, the medium for the middle, and the big one for the bottom. Then traced them onto the dry watercolor paper.


 I showed students how to fold the circle in half, then in half again for a 'pizza slice' and how to cut a few triangles out with scissors on each side. Then unfold and glue down on your paper. Beautiful! Use metallic crayon for the details like the eyes, scarf (if they chose), hat, arms and more. Then I showed students how to make a glitter scarf. I have a glitter system. I have box top trays with a small container of glitter. I tell the students to draw with glue, put your art in the tray, use the pinch and sprinkle technique to sprinkle on the glitter on the glue, and then keep inside and tap off the excess. THEN they can remove it from the tray. I also showed how to make a 'scribble scarf' so that way the scarf won't be a big gluey mess. I also mentioned to the kids by keeping the excess glitter in the box top, we can reuse the glitter and have more glitter for other projects! Yay! More glitter for us!


If students finished early, I showed them how to write a story about their snowman to take home and enjoy!

Snowman highlight/shading Snowglobes!


 3rd graders learned a little bit about highlights and shading with our snowman snowglobe. I talked about how light projects and how sometimes it can't reach around an object so you might see a shadow on the other side or it might be darker since the light can't reach. Using white oil pastels, we traced around a circle tracer for the globe. Use the side of the white oil pastel to go around the inner edge to show the 'glass glare'. Then I showed how with a pencil, to draw the snowman. Then color in solid with a white oil pastel. To get the highlight, I showed how on one side trace over the snowman, on the other trace around the snowman with blue oil pastel. Now rub and blend the oil pastel on the blue edge. Students thought this was so cool!


 After students colored in the snowman, they could add some snow on the ground, little white dots of snow falling, and of course lots of detail to their snowman. I pretty much told them they could add whatever they wanted in the background as long as it was appropriate. Next using scrap paper, they traced a base, cut it out, and glued it on the bottom of the globe and could design that as well. Students really enjoyed it!


Friday, December 16, 2011

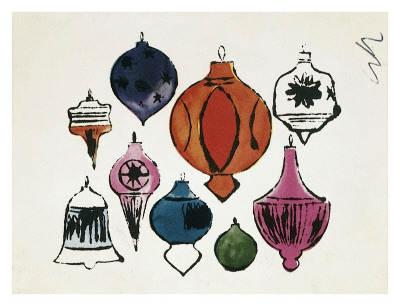
Andy Warhol ink blotted line ornaments!


4th graders learned a little bit about the artist Andy Warhol and his special blotted line technique. He started his first prints with this process where he would draw with wet ink and before it dried he would lay a paper on top. Then smooth the back and peel off to produce a textured, uneven lined print. He was soon hired to make advertisements for shoes in Vogue magazine using this technique. He even made some holiday themed ones (the ones from below). We made our own ornaments using the same technique! Then filled in with pattern and line pattern with lots of color! Check em out!


place copy underneath the clear printing plate then carefully using plastic bristle
brushes, dip into 'ink' (watered down black paint)

Then quickly before it dries, place a paper on top without moving it around

...then peel off to reveal print!

this student went very in depth with their pattern using pencil first befor filling in with colored pencil!

...we drew a string hanging from each with a rectangle to show where the metal piece holds onto the ornament 


Thursday, December 15, 2011

Holiday Parody American Gothic Ornament/Card!


2nd graders had a good laugh and learned about the famous painting "American Gothic". We learned that American Gothic was a milestone for the Iowan artist Grant Wood, and was accepted to be part of the collection at the Chicago Art Institute (I showed a picture of myself taken with the actual painting). We even revealed some fun facts about the painting: The 'farmer' in the painting infact is no farmer at all, but Grant Wood's dentist who posed with costume, and the 'farmwife' is in fact Grant Wood's sister "Nan" that posed for the painting. "American Gothic" gets it's name in relation to the center window on the farmhouse because it's a Gothic architectural window.

I let students know that no worries if you don't celebrate
Christmas holiday. Turn your American Gothic into a Mr. and Mrs. Frosty snowman!

Then we looked at some hilarious student renditions of their own holiday or winter themed parody. I randomly fell upon an image search which led me to pictures of students work on a website, so I wish I could take credit for this originalty, but can't! However, pass this on because the students love it! We looked at each of the students' examples and talked about how you would go about making it, what they used, and what changes were evident from the original "American Gothic". We talked about all the possibilities for materials. Oil pastels give good solid coverage on a copy along with markers, color pencils are great for detail and are nice and bright along with crayons.


love the giant bell instead of a pitch fork! Clever!

I shrunk down a copy to about 5 1/2" x 6 1/2" and washed out the copy a bit. Then I cut a bunch of holiday color (blues, greens, reds, yellows) construction paper (to glue to the back before paper punching to make into an ornament if they chose) and also made copies of a 'clothing template' so they could cut out the template and trace on scrap construction paper to glue on and size clothes easier.


I lolve the sequin earring and detail scarf in the pocket!

After coloring in everything and adding detail to the background, students cut out the American Gothic. Then glued a piece of the same size construction paper to the back. I encouraged students to write the date and/or a holiday greeting to transform it into an ornament or card/present. I had ribbon, yarn, sequins, and cotton balls out to pull apart for faux fur fluff!


tracing the 'clothing' template on scrap blue paper


Wednesday, December 14, 2011

Monet's Waterlilies

http://artasticartists.blogspot.com/2011/03/going-greek-scratch-into-history-with.html
4th graders are finishing their Monet unit and learning about the man who started Impression! We made our own Monet-esque painting and 3-D waterlilies. Click on the link above to take you to the indepth post!


http://artasticartists.blogspot.com/2011/03/going-greek-scratch-into-history-with.html

3rd graders are moving on in history and reached Greek and Roman art. We learned all about Black Figure Scriffito Greek pottery. We discovered these Black Figure vases/pots come different shapes and each shape had a certain purpose for what it held. By clicking on the link above you can see the past post on this.