Sunday, November 27, 2011

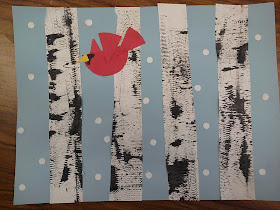
Textured Winter Birch Trees and Cardinals


1st graders made a winter scene with textured paint to form birch trees along with a cardinal in flight as it snows! I know it's early but the sooner it's done, the longer the students can enjoy it during the season! Before we started, we put our names on the back of the light blue paper. For the trees I instructed the students to create textured paint on their white piece of paper by taking a very small amount of black paint and combing it out (focusing on hardly getting any black paint on the paper so that most of the paper remains white and if there's any globs, keep spreading and combing till dry) across the paper.


While it dries (should dry fast if they followed the direction of hardly having any black paint and combing it out really well!), trace a circle on a red square of paper. Cut out the circle and pretend it's a pizza. Cut the pizza in half. The bottom half, put to the side. That will be the body. The other half, cut into 3 slices: 1 for the mohawk (the tuft of feathers on the head of a cardinal), 1 for the wing, and 1 for the tail. Then add black crayon for the 'mask' on the face of the cardinal. Glue 'slices' in place on the cardinal. Find a yellow scrap to cut a tiny triangle out for the beak. Glue in place. Snip off if necessary.


Check on the painted paper. Should be dry! I showed students how you could really cut the paper for the trunks 2 different ways. I said I like to do the nice tall way so then it fits the paper better and I can 'give it a hair cut' (snipping off the ends after glued). Glue trunks in place. Throw scraps away.

students hard at work!

Paper punch white scraps and glue on for a light snowfall in a birch forest. 1st graders did an amazing job!


Claude Monet: Discovering Impressionism!


4th graders learned all about the artist who started the Impressionist art movement, Claude Monet! We learned about who he was as an artist and his signature 'dabbing' brushstroke not focusing on detail but capturing a moment in time. Stand far away and see it all come together as your eye does the mixing of the colors to form the image! On one side of the worksheet had a summary of the artist and a picture of one of his many waterlily studies. On the other side, there is a copy of his 'waterlilies' to fill in with paint. Student were given Q-tips to create the 'dabs' of paint to fill in and recreate his masterpiece- concentrating on making the same type of brushstrokes as Monet.


I instructed students to not 'paint like a paint brush'. We're also not doing perfect dots like that of Seurat. Simply, just dabs of paint. Then we put them into the drying rack. This is a great way to do it because  you have the information of the famous artist and what we learned in class on the other side so parents can see what we're working on with a great explanation!


Chihuly Glass Bowls!

student fill their 'glass' sheet with as much color and pattern as possible to show off their skills

2nd graders brushed up on the glass blowing artist Dale Chihuly (one of Miss Oetken's faves!). We watched a YouTube clip of Dale Chihuly explaining how he makes his art and watched the process through a tour of his art forms and 'hot shop' glass studio. We ooo-ed and ahhh-ed when looking at all of his different glass forms. Some classes got to learn all about the inside of the hot shop and the terminology of the tools through a interactive website http://www.childrensmuseum.org/themuseum/fireworks_ofglass/games_35.htm 
The link above is also under ART GAMES heading on my homepage. Then we talked about how important color, texture and pattern is in his sculptures and glass making. We concentrated on Chihuly's bowls with using Sharpie permanent markers on a sheet of clear Graphix shrink film. We put a piece of white paper underneath so if we colored then it wouldn't get on the table. When student were finished they put their "sheet of glass" on the shelf.

Dale Chihuly bowls

Dale Chihuly glass blown sculpture


Dale Chihuly glass chandelier

Students then could use the paper under their drawing as free draw paper to design a Chihuly glass form of their own and color it in. Some made chandeliers and some made sculptures!


Students could also do a fun worksheet where they were asked to design a glass Chihuly bowl, chandelier, or sculpture of their own and color it in. There was also a Chihuly word search with class vocabulary words.


students filling space with Sharpie marker pattern


after taking the Chihuly bowls out of the oven

http://artasticartists.blogspot.com/search/label/Chihuly I have posted about this same project in my labels. Just click the link to see the post.


student work

Wednesday, November 16, 2011

Mouse Paint! Primary colors and color mixing


Kindergarten has been learning about colors and other elements of art. We have talked about the primaries but now we're moving on to secondary colors and how they're made! We read the book "Mouse Paint" that tells a "tail" of how 3 mice do some color mixing of their own and learn how from the primary colors (blue, yellow, and red) new colors such purple, green and orange are made. What a great book to show and explain color mixing! We had fun and use some old, boring brush---we used FINGERPAINT to do our mixing!!


I got smart about finger paint. I bought these inexpensive squirt bottles from Wal-mart. Then I wrote the names on the papers and squirted a little dot of each color. Then students mixed inbetween colors to make the secondaries! Then when dry, made copies of the mice for students to cut out and glue down!


Tuesday, November 15, 2011

Piet Mondrian and the Primaries!


Kinders learned about the primary colors (yellow, red, blue) and about the famous Piet Mondrian. We used black cut thin strips of construction paper. I showed students how to make a with tic tac toe grid. You might want to have really wide rows, or really close together rows. Use baby dots of glue on the strips to glue down. Then pick one square for red, one for yellow, and one for blue. Then give the strips, if too long hanging off the page, a "hair cut" (cut off the ends:) ).


Michelangelo, Renaissance master....and Ninja Turtle


 4th graders learned all about the Renaissance master, Michelangelo Buonarroti. At this point, rounding out our Renissance unit, I wondered if students picked up on the names Leonardo, Donatello, and now Michaelangelo. I asked students if they've heard of the Teenage Mutant Ninja Turtles. The class erupts. DID YOU KNOW THAT THE NINJA TURTLES WERE ALL NAMED AFTER RENAISSANCE ARTISTS?! Splinter must have been an art lover.
As for Michelangelo the artist, he had natural talent even from a very young age. We learned all about the history of his masterpieces and even what he was like as a young boy. He loved chiseling sculptures out of large blocks of marble but also was an amazing painter. We looked at some of his very famous works such as David the sculpture and the ceiling of the Sistine Chapel, which Michelangelo painted while laying on his back on scaffolding.  As a class we wanted to experience what that must have been like to paint an endless ceiling laying on your back.

 Students were given a photo copy of "the fingers touching" of Michelangelo's God creating Adam from the Sistine Chapel ceiling. We then taped them to the under side of each table to act as the 'ceiling'. We talked about Do's and Don'ts of safety with paint. Each table moved and stacked their chairs to put to the side so we could easily lay underneath the table. We used flesh tone to paint in the hands and then used other fun colors to paint around the background.


We also talked about the famous David marble sculpture made by Michelangelo. We heard in the video that he "needed some clothes". SO that brought us to the art careers discussion....fashion design!


We talked about how fashion design not only means designing clothes, but there are many careers based on this concept! Costume design for movies/sets, costume design for musicals/theater on stage, designing for stores, the fashion worlds making new trends, dand even being a designer for celebrity clients (we definately chatted about "Project Runway").


Students used markers and colored pencils to draw new styles on top of the famous David. But we needed a female model too to wear some feminine style clothes too! So we used Botticelli's "Venus" from "Birth of Venus" paintings. Don't worry, we had swimsuits on them that the students then colored over. :) Students came up with some amazing new styles! They loved this art lesson!


Tuesday, November 8, 2011

3-D Van Gogh Sunflowers on Table


2nd graders learned all about Vincent Van Gogh as an artist and made our own 3-D version of his famous Sunflower painting study below.


2nd graders first drew with pencil Vincent's vase. We drew these on a small slip of paper and showed a short cut on how to start the vase from the bottom of the paper so it's flat on the bottom. Then we talked about how to draw a sunflower. It is different from the traditional daisy most students know how to make. We talked about how the center is a large brown circle and how the petals are short and pointed, and there's lots of them. We agreed it did look like a sun! Name/class on the back in the middle (for when they get cut out!)


 After drawing, I let students know that they could either use oil pastels or crayons to color. First we outlined the vase with yellow. Color in the top stripe solid. Then yellow oranges and yellows for the sunflowers and green stems.


 Then I had containers of watered down yellow paint to be like "yellow watercolor" but everyone's was the same consistancy so this worked great! (Becky Brandt, you taught me everything!) Paint over the top so it's like a crayon resist! Next, get a sheet of yellow 9x12 construction paper. Fold in half. Paint one side with watered down brown paint for the table.


Brown watercolor on one side


 Let dry for next time! (We watched "Getting Know the World's Greatest Artists: Vincent Van Gogh" for half the time to learn about the artist and did the first half of this project). Now once everything is dry, fold the yellow constrution paper in half. Cut two slits ON THE FOLD half way down.


              Open up and pop out the middle, make fold so it then looks like a chair.


I told students to put glue on the 'wall' the part that sticks out. Then cut out the flowers and vase and glue on so it looks like the vase is sitting, NOT floating on the table. Viola! Vincent Van Gogh 3-D sunflowers!