Wednesday, October 26, 2011

Waving Monsters


I love this ryhming book that's all about cute and hilarious monsters called "Monster Munchies". The students roar with laughter and the pictures are great for inspiration for monster drawing since there are such a wide variety of color and different types of monsters. After the book I showed students how to make a "waving monster". First make a fist. Put the fist near the edge of your paper (hot dog style position of paper) and trace around with a crayon. Lift up and you'll see you have a "paw" or arm waving. Then draw a large wavy oval around the whole paper to create the monster. Fury? Slimy? Hairy? How many eyes does it have? Does it have eye lashes? Eye brows? Mouth? Teeth? Is it mean? A girl or boy? Legs? More arms? Give it some line and pattern. Color it in with bright crayons!


Primary Colors with Jasper Johns!

Jasper Johns famous painting


Kindergarteners studied the primary colors (red, blue and yellow) and made their own version of Jasper Johns masterpiece! We looked Jasper Johns and with the same colors of paint, we dipped forks into paint and make fork prints every-which-way to get the same effect!


Tuesday, October 25, 2011

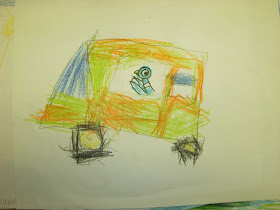
Don't Let the Pigeon Drive the Bus!


Vroom Vroom, Pigeon at the wheel!

 I absolutely love the Mo Willems pigeon series. They are hilarious, easy reads, make kids laugh, but also learn. Don't Let the Pigeon Drive the Bus imitates what children act like when they want something really bad. They pry, beg, and say just about anything hoping you'll grant their only wish! This books helps kids relate and laugh. He's begging to drive this bus that the bus driver left and he asks his audience, Can you watch my bus? Oh, and don't let the pigeon drive the bus!


We brainstormed what else could the pigeon dive? Different modes of transportation! We raised our hands and went around and came up with a huge list of different ideas. I made the hand out above. First color in the pigeon with the steering wheel. Then cut out. Glue your pigeon in the middle of the paper. Use a pencil to draw what the pigeon will drive. Color in with crayon! Where is the pigeon? Does it need a sky? Is it driving on the road? Trees? Is it a monster truck? WHere are the cars it's driving over?


just a pigeon driving down the road on a sunny day


Watch out! Pigeon driving a semi on the road!

pigeon driving a bus

deep sea diving in a summarine!

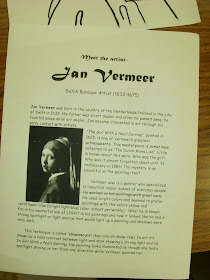
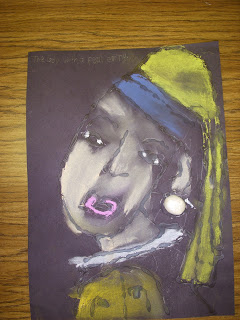
Chiaroscuro with Vermeer's "Girl with the Pearl Earring"


I posted this before (http://artasticartists.blogspot.com/search/label/Vermeer) , but I just wanted to show you amazing the students did on showing "chiaroscuro" (showing a bright light source and having deep dark shadow/contrast). First we did the step by step drawing together. Then traced over with glue. When dry the next time, I had the students follow me with how to apply color with the pastel. We worked color by color and were not allowed to shade with their finger until we were done. We made sure we barely applied the chalk pastel, therefore the other half would have a dark shadow and not much color. Then students made a small Model Magic earring, hot glued it in place (we went over glue gun safety!) with a dot, and then came back to their table where I had metallic medium and plastic brushes to paint their earring that was already attatched.
a handout I tweaked that talks about the history of Vermeer and the painting


A student going over the pencil drawing after we walked through it

painting metallic medium on the clay pearl earring


Friday, October 21, 2011

Patterned Egyptian Sarcophagus with Tooling Foil Cartouche


3rd graders are learning about pattern in Egyptian art by making their own patterned sarcophagus. We looked at different Egyptian artifacts such as a Pharoah's death mask, sarcophagus, and neck piece and pointed out pattern in all of them. We talked about what exactly is pattern. Now we're ready to focus on our sarcophagus! First we traced the shape & drew the details with pencil. Then traced all of our pencil lines with construction paper crayons (really bright on dark paper!). After that we filled in with many lines of pattern going horrizontal with LOTS of color! Now we're ready for our cartouche!


Using the heiroglyphic alphabet, students took small rectangles of gold tooling foil, and make a cartouche. Using a pencil and keeping the foil ontop of their alphabet worksheet, they push into the foil to draw the symbols for each letter of their name. Then place a ring around it because "cartouche" mean to "encircle". We talked about how your "ka", or spirit, back in Egyptian times, couldn't go onto the afterlife without having a cartouche on the sarcophagus.

coloring in their cartouche with sharpies

finishing line pattern


using pencil to push into gold tooling foil using heiroglyphics alphabet to create a name cartouche

Making a Egyptian neckpiece to wear when finished with the project. Students used Egyptian
books to find items to draw and decorate it

Thursday, October 20, 2011

PiCaSsO FrAnKeNsTeiNs!


2nd graders learned about Picasso's famous style of faces. We talked about how in Cubism, his faces actually combined more than one view. We got this wonderful idea from Mrs. Picasso's Art Room blog. Here's the amazing step by step tutorial!


2nd graders did such an amazing job! We only required head and mouth tracers and the students cut the rest! First each student, one quiet table at a time, would come up to get 2 colors of green paper and a pencil, then trace the head on each piece. Cut both out. Then taking a pencil on ONE of the heads, draw a line half down, make a nose (we talked about making all different kinds, long, pointy, short, round ), and then draw the line straight down to divide the face. Cut on the line. Save the side with the nose sticking out. Glue on top of the full head lining it up with the edge. Use a purple piece of paper to make the shoulders. Just make an arch and use the bottom straight edge of the paper (make sure your paper is hamburge way, nice and tall). With a scrap of the green, cut a rectangle for the neck.


Now glue the shoulders down and line the purple edge up with edge of the background paper. Then the neck on top, and then the head. I told students go to the basket station and take their paper with them after they have the head, neck and shoulders glued on. At this station, I had Fall baskets that had white paper strips (to draw and cut the eyes out of) and black strips (to trace the mouth). Then cut and glue down the mouth. For the eyes, cut out (football like) the eyes. Use markers or colored pencil to color the inside pupil. Then glue on, in a "Picasso style" with one eye higher than the other. Use the the scrap of white paper to cut out and glue teeth in the mouth.  Then use black marker for hair, outlining if desired, stitches, and bats/spiders!


Girl Frankenstein! Isn't she a beauty.